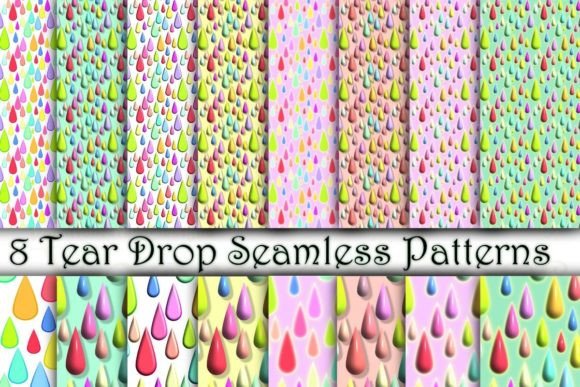
8 Tear Drop Seamless Patterns
If you’ve ever spent 20 minutes trying to tile a watercolor-style tear drop motif without visible seams—or worse, ended up with jagged edges ruining your fabric mockup or social media banner—you’ll appreciate what 8 Tear Drop Seamless Patterns solves. This isn’t just another decorative pack. It’s eight carefully constructed, truly seamless PNGs—each built from the same underlying vector pattern in Affinity Designer—then enhanced with subtle, purposeful effects: soft shadows, delicate halftones, gentle grain overlays, light transparency shifts, and matte-to-sheen transitions. The base geometry stays perfectly aligned and repeatable; only the surface treatment changes. That means you get consistency *and* visual variety—without sacrificing scalability or editability.
Where these patterns actually get used (beyond “just for fun”)
Seamless patterns aren’t niche—they’re infrastructure. You’ll find them working quietly behind the scenes in places you interact with daily:
- Small business owners use them to design branded packaging liners—think kraft boxes for handmade soaps or ceramic mugs. A soft, organic tear drop pattern adds warmth without competing with product photography. One maker told us she dropped Pattern #3 (the one with the subtle paper texture overlay) into her Canva templates and immediately saw higher engagement on Instagram Stories showing unboxing moments.
- Educators and workshop facilitators apply them as low-distraction backgrounds for printable worksheets, slide decks, or digital handouts. Unlike busy florals or geometric grids, tear drops offer gentle rhythm—calming enough for focus, distinctive enough to reinforce a theme (e.g., “growth,” “flow,” “transformation”). A Montessori teacher uses Pattern #6 (matte finish, no shadow) behind vocabulary cards—it doesn’t interfere with letter recognition but gives each page a quiet, intentional feel.
- Freelance designers and bloggers rely on them for quick asset swaps. Need to refresh a client’s newsletter header? Swap in Pattern #2 (light gray tone, minimal grain) instead of rebuilding from scratch. Updating a Shopify store banner? Layer Pattern #5 (slight transparency + soft glow) over a neutral photo background—it lifts the composition without demanding new photography.
- Hobbyists and crafters print them directly onto iron-on transfer paper for custom tote bags or quilt labels. Because each file is a high-res PNG (300 DPI, transparent background), there’s no white halo around the shapes when printed on dark fabric. One embroidery artist uses Pattern #7 as a guide layer beneath satin stitch—she traces the repeats by eye, then removes the digital layer before stitching.
Why flexibility matters more than flashiness
What makes this pack genuinely useful—not just pretty—is how little it asks of you. You don’t need to know Affinity Designer. You don’t need to adjust blend modes or mask layers unless you want to. Each PNG is ready to drag into Photoshop, Figma, Cricut Design Space, or even Google Slides. And because the underlying structure never changes, you can mix and match: use Pattern #1 for your website hero section, Pattern #4 for email footer tiles, and Pattern #8 (the high-contrast version) for a limited-edition sticker sheet—all while keeping visual cohesion across platforms.
This isn’t theoretical. A freelance illustrator building a brand identity for a wellness coach tested all eight versions against real constraints: Would it hold up at thumbnail size on Pinterest? (Yes—Patterns #1, #3, and #8 retained clarity.) Would it print cleanly on recycled paper? (Patterns #2 and #5 minimized ink bleed.) Could it be recolored non-destructively in Procreate? (All eight responded well to hue/saturation adjustments—no banding or edge artifacts.)
What to consider before using them
Not every tear drop pattern suits every context—and that’s okay. Here’s what users tell us they check first:
- Scale intention: These patterns are optimized for medium-to-large repeats (approx. 3–6 inches at 300 DPI). If you’re designing postage-stamp-sized icons or micro-textures for UI elements, zoom in first—some details may soften. For apparel or wall decals? They scale beautifully.
- Color harmony: All files are grayscale or neutral-toned, not black-and-white. That means they adapt smoothly to brand palettes—but if your project relies heavily on neon or metallic tones, test how Pattern #4 (soft grain) interacts with vibrant overlays before finalizing.
- File workflow: They’re PNGs—not vectors—so you won’t be editing anchor points. But that also means no font or software dependency. Open them in Preview, Paint.NET, or GIMP, and they behave predictably. Just remember: resizing beyond 200% in raster editors may require slight sharpening.
- Licensing clarity: Use them commercially—on products, websites, presentations, or client work—no attribution required. But don’t resell the PNGs as standalone assets or claim authorship of the original pattern structure.
Real outcomes—not just features
One small-batch candlemaker reduced her design prep time by nearly 40% after switching from manually tiling SVGs to dropping in Pattern #5 for jar label backgrounds. She kept the same typography and logo placement—only changed the repeat—and customers started commenting on the “calm, cohesive look” of her online shop.
A university communications team replaced generic stock-patterned PowerPoint templates with Pattern #2 across all faculty training decks. Attendance and post-session survey completion rose slightly—not because of the pattern itself, but because presenters reported feeling “more confident in the visual foundation.” Less time troubleshooting alignment = more time on content.
And yes—crafters really do notice the difference. A quilter shared that using Pattern #3 as a digital layout guide helped her spot spacing inconsistencies in her piecing *before* cutting fabric. “It’s like having grid lines that breathe,” she said. “Not rigid, but still reliable.”
Final note—this is made for doing, not just collecting
If you download 8 Tear Drop Seamless Patterns, open one file, and immediately paste it into something you’re already working on—a Canva flyer, a Figma prototype, a Silhouette Studio project—you’ve used it right. There’s no “right way” to start. No tutorial required. Just one less thing standing between your idea and the finished piece.
And if something doesn’t behave as expected—say, a pattern looks blurry in your PDF export, or the transparency isn’t reading correctly in your cutting machine software—reach out. I’ll help troubleshoot it. Not with a canned reply, but by asking what software, version, and output goal you’re using—then walking through it step-by-step. Because tools like this only matter when they fit into your actual workflow—not the other way around.